Tuesday, January 31, 2012

Baseball Layout

I LOVE sketch challenges, especially ones geared towards Scrap Book layouts. That is why I love Let's Scrap! Take a look at this week's sketch!


I spent some time trying to figure out what to make with the circle element. I wanted to take it literally and make something with it. I thought of making it into a sun, or a plate, or a tire... but I decided on a baseball! Perfect for scrap booking a game outing this past season!

"01-25-12" Sketch from Let's Scrap


I used a small "X" letter stamp to create the red thread stitching on the baseball. My bases are "Pacifica" card stock. The daisy white circle shape was cut on my Art Philosophy Cricut cartridge at the 9 1/2" setting. For the scatter accents of the layout I used star stickers. The other papers are fourth of july type papers I picked up at Michaels.

Thanks for looking! Let me know what you think!

Sunday, January 29, 2012

New CTMH Product Blog Hop!

There is a lot of excitement amongst crafters when the new Idea Book is released! Welcome to the New Product Blog Hop. You will get to take peek at the newest products and see what the consultants have been creating with it. The Spring Summer 2012 Idea Book will go live on the Close to my Heart website on Wednesday February 1st. I am SURE you will some items on this hop that peak your interest.

Thank you for hopping here from Melissa's Blog, I love what she created with the NEW "Cruisin" Kit!

The new workshop on the go kit that caught my eye first was the "Stella" Kit. I love the colors in it! I paired the Stella papers with the Canvas Complements that coordinate to create this special layout.

Layout using Stella Paper and Canvas Complements
Canvas Stick-ease. Groupings in numbers of 3 are aesthetically pleasing, so I chose 3 circle shapes from the canvas stickers and placed them vertically along the side of my page.


This sentiment from the canvas complements was perfect for this family event of celebrating a birthday.
This NEW Idea Book is a very exciting one! I am very excited about the new paper packs, fresh ideas, and brand new products. I have a fabulous wishlist of items I can't wait to try! Springs, baker's twine, studs, peeps, dinosaurs... :) Can't wait to hear what things you are most excited about.

Now hop over to Lalia's Blog and see the Amazing wall-hanging she created with the NEW paper pack "Florentine".

The NEW "Stella" Kit!

I have had a lot of fun creating with the "Stella" kit from the Spring/Summer 2012 Idea Book, which goes live on Feb. 1st! I really like the trendy color combinations and the grid pattern on the main layout. The stamp set that it comes with has some really cute sentiments on it too! Check out the layouts I created. I will be teaching these at a workshop on Feb 18th!

Stella's Featured Layout: Pictures= Qty 4: 3x4 V, Qty 4: 3x3, Qty 1: 2.5x3. 2 Cocoa bases, I will provide cricut cut  hearts and scallop shape for title. You will have access to my Token Alphabet to create titles.

Stella's Recommended Layout: Pictures= Qty 1: 8x10, Qty 3: 3x3. We will use the accessories pack that comes with the kit. You can also use my Token Alphabet and 1 1/4" circle punch to add a title to this page too.

"Hocus Pocus" (Pg 56 from the how to book "Magic") Pictures: Qty 1: 5x7 H. Qty 2: 4x6 H. Qty: 3: 2x2

"Lovely Assistant" (Pg 96 from the how to book "Magic") Pictures: Qty 1: 4x6 H, Qty 4: 3x4 V, Qty 1: 3x3. We will use my stamp set "Tailor Made" to add accents to the pages.
 When your kits arrive I will insert a cutting guide that will list all of the cuts we need to make to create these pages. We will be able to move through all of the pages if you are able to make your cuts before class. A tip from one of my customers is to pile up all of the cuts that go to a certain page and sandwich them in a piece of folded scrap paper. That way you are not scrambling through a stack of paper while we work. Please get a hold of me if you have any questions about cutting your papers.

Remember that I will need to place our supply order on Feb 1st or 2nd so that we will be sure to have our kits in time. Please email me with your RSVP order.

Friday, January 27, 2012

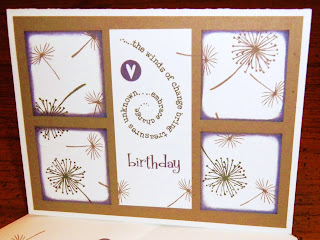
Birthday Season!

I love to make my friends and family handmade birthday cards. The next two months holds most of the weight of the birthday creations I will be making! Using sketch challenges to keep me on my toes is perfect motivation to keep my ideas fresh and get my cards made!

For this Birthday card I went to Mojo Monday's card sketch challenge 225.


I love the grid type look to this design. I decided to play on that so I lined up my pieces just as they would be at final placement and stamped my dandelion pieces across them. I made sure to break over the edges so they would create "movement" around the card.


I kept the middle piece simple and clean so that the phrase and sentiment would have feature impact. I used "smokey plum" ink and sponged the edges of the square pieces. I stamped the other items in "cocoa" and "chocolate" ink. My card base is Colonial White and the panel base is Kraft Paper Brown card stock. For the spiraling sentiment I used the stamp set "Treasures". The "birthday" word came from the stamp set "A little Everything". (All items I used to create this card are from Close to my Heart).


Simple inside

Sunday, January 22, 2012

Crystal Blue and Amethyst


Crystal blue and hints of Amethyst are a beautiful color combination you can find in Close to my Hearts paper pack titled 'Wonderland'. I paired them together here an this winter thank you card. I added a little glitter and shimmer in the snow sprayed texture.

My card base is Crystal Blue card stock. I sprayed it with my snow mix in my new spray pen. (7 parts water, 1 part daisy white re-inker, 1 part pearl paint). I cut squares from my left over scrap B&T Duo papers and sponged the edges with white ink. I pieced the squares together leaving gaps between and leaving one space blank for the "snow" to show. I added cricut cut snowflakes from the Art Philosophy cartridge. I glued one to the surface of the card and the 2nd one is on a 3D foam piece to make it pop. The thank you sentiment was stamped in Crystal Blue ink and punched out with my circle punch. It is also on a 3D foam piece. Let me know what you think!


This inspiration to pair these colors together was from the current Heart 2 Heart Blog Challenge. You can play along too, just use your CTMH products to create a project.

Visit my website if you need to purchase new supplies. http://heatherjane.myctmh.com/

Baseball Photo Album

Photo Album
Wanted to find a fun way to send my Brother-in-law copies of photos we took at his Birthday party this past year. We traveled down state to go to a baseball game and have lots of great pictures! I decided to create a Birthday Mini Photo Album for him. I created the cover for it with the Mojo Monday Sketch Challenge as a template.


I used the colors from the jerseys of the team we went to see, blue and red. I used a ticket I had saved from the even as one of the decorative elements on the cover. I thought the popular pennant shape went well with a sports theme. The spot of the sketch that called for a circle was a perfect place to put a baseball! I created the baseball with my circle punch and the tiny button stitch stamp from the "Tailor Made" stamp set from Close to my Heart. The papers are from the new "Cruisin" and "Hero" paper packs.


Now to print the photos and get this in the mail before he wanders onto my Blog and see's this! LOL!

Sunday, January 15, 2012

First 7 Days Layout

I created these scrap book pages to feature the details from my Son's first week in the world.


I took notes about his first bath, his hospital visitors, when we went home, the price of gas, the weather, etc. I am going to write the information in by hand so that it is in my hand writing. Each spot that is indicated by "3x3" is where I will put a photo for each day.

Tuesday Trigger Inspiration Photo

I was inspired for my layout and color choices by the Moxie Fab World Tuesday Trigger. Let me know if you see the resemblance or not. :)


Sunday, January 8, 2012

Winter Thank You Card

The new year is a great time of year to share your gratitude! Thank someone for a very special Christmas Gift, or just let someone know how thankful you are. If you don't tell them, they won't know! This is why I wanted to make some special winter themed Thank You cards with my Close to my Heart Wonderland kit scraps.


I found the idea for this design pattern from the Mojo Monday Blog challenge contest.

For my circular element I used my Art Philosophy Cricut Cartridge to cut a snowflake. I used a grey flannel colored ink pad to add dimension to the edges of the pennant shape and sentiment. I just rubbed the edges of the paper onto the surface of the ink pad. To add a little glisten, such as a snowflake would have, I added clear sparkles as accents.


Sunday, January 1, 2012

Get Crafty-Organized! Clip-it-up Mini!

I can't wait to share this craft organizing tool with you! I have wasted a lot of my valuable crafting time searching for embellishments I KNEW I had, but could not locate. I would search all my craft stash places, the kids toy boxes (in case they had been smuggled away), and the latest pile that was made picking up... Very frustrating to not find what I was looking for.

So I set out on the web in search of a solution that I knew I would use and would be the best scenario possible to avoid future time loss. I found lots of craft room tours, which I drooled over, while waiting to hear thier best found solutions for storing embellishments... Here is the one I hear the most...


The "Clip-it-up"! It is like a miniature clothing wrack that spins, only instead of the latest fashions, you can set it on your desk or counter space and store your entire collection of embellishments. Each item gets its own clip. So when you spin through your items and find the one you are looking for you simply un-clip it, then when you are done you put it back in the same spot. The "clip-it-up Mini" is the perfect size for hanging up all those small sticker packs, flats of sparkles, ribbon in bags, and my favorite- Mini-Medley variety packs from Close to my Heart.

Carry it by the handle on the top.
Spin it so that the section you want to look at is in view.

I am so excited to own this item now and have it loaded with my supplies. It is so simple to use! So, if you are out there looking for a great solution for organizing your embellishments, I hope that this post helps you. Please know that I was not paid by this company to mention it. I am simply just genuinely excited about the product and had to share.